Monday, December 24, 2012

Wishing Happy Holidays

Angels we have heard on high,
Sweetly singing over the plains,
And the mountains in reply,
Echoing their joyous strains.


As I was stitching out these angels I was singing this song in my head from my very old school days!
A friend noted that they looked like carved marble in twilight!

A beautiful angel ornament that is glowing and spreading its warmth and cheer during this holiday season. May the joys of the season warm your heart with goodwill, peace and love.
Wishing all a very Merry Christmas and Happy Holidays.

Wednesday, December 12, 2012

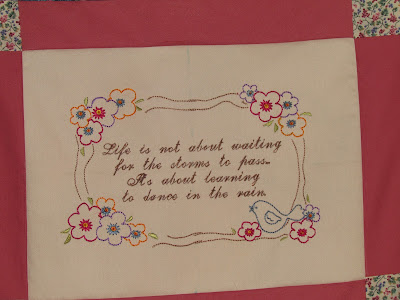
My Wall Quilt

Jenny of elefantz gave away these wonderful BOM designs to create a quilt. I found her blog sometime in March and was completely hooked by the serenity of the designs. 2012 was a year of introspection and revelation for me.

The idea of putting verses inside the floral framework was a spiritual journey of love, hope and prayer for my family. In the mad rush of staying on top of everything we often lose sight of the path. We make mistakes that we never intended to make. But life has its way to remind us that we cannot always plan and control our destiny and that comes as an eye opener.


Creating the designs with my favorite quotes brought a sense of beauty, calmness, and healing that has ultimately strengthened my humility.


 I have deviated somewhat in the structure of the quilt too. Here is where I have talked about the other aberrations.  I lack the accuracy of a true quilter but finally putting this together as a wall quilt for my home has made me very happy.


 On a technical note - the quarter inch foot and stitch in the ditch foot has saved my life!


Once again Thank You Jenny from the bottom of my heart.

Monday, September 24, 2012

Anthropologie Rosette Duvet Cover - DIY


“Moving around every 3-9 months can make it difficult to feel like you have a home. There's always the family house that you grew up in, but sometimes you just need a taste of that when you are away at school. After years of having a typical college dorm set up, I decided that it was about time I updated my bedroom decor. A graduate school apartment should look more refined than an undergrad dorm, right? After some quick searching online, I came across a variety of lovely intricate textured bedding from Anthropologie. Unfortunately, the price tag, north of $200, was way outside of my budget. For the time being I pushed them to the back of my head labeled in a folder called "someday". “


That was my DD's voice. On one of my visits to see her, she conveyed these thoughts to me during one of our late night conversations. I was curious to see what it was, so she quickly googled the image
She asked me if I could recreate it, and I told her that it was simply too ambitious and couldn’t be done. Sadly we attempted to look for cheaper alternatives, but none of them could compare to the original. While searching, we stumbled across a blog where someone had posted their experience doing a DIY of the exact bedding we were interested in! We excitedly read through the part one and part two. Although it appeared to be quite a massive undertaking, we decided right then that we would commit to the project. We made a goal to complete the bedding during the Labor Day weekend.

Luckily, my well-stocked and underused stash contained two Italian flannel bed sheets, which I had bought during a great sale. We decided to use them to create our duvet cover.

Unfortunately, we wanted to create the cover for a full size comforter, and the directions on the DIY tutorial were for a queen size comforter so all the measurements were off. We did some quick math and searching and discovered the standard full size comforter measured 80" x 90". If we made squares of size 15" (originally cut the squares 19" and then the circle in the center reduces the square by 4") with a circular diameter for the rosette of 6" and made 4 pleats per side, we could get pretty close to the right size.
15x15 square with 6 inch diameter center


One complete block


Determining the correct size and creating a template took us 4 hours, after which we spent about 6 hours (two pair of hands) assembling the rosette squares.
Blocks joined to form the first row
Completed top placed on top of full sized comforter


We needed to attach each rosette square to some existing fabric in order to fashion a cover. We picked up two full size bed sheets in a coordinating color and arranged the squares leaving a 2" border all the way around to make up for the missing inches needed to cover the comforter.

Afterwards, attaching our quilt squares to the top sheet took quite a bit of thinking because neither of us are quilters. Because of this, we spent a long time using trial and error to figure out how to attach the quilt top to the top bedsheet without any puckering and preserving our 2’ border all around so that the final cover would be the correct size for the comforter. 10 hours later, we had assembled everything and created ties to close off the open end.
And the final product

And a closeup


In case you were interested in re-creating this yourself, I’ve included a couple of helpful hints that can save you the time we wasted.

  • ·        2 Full Size Sheets for the actual cover
  • ·        Flannel Bed sheets for quilt top -1 Queen, and most of 1 Full
·        When you attach the flannel to the top sheet,  use a disappearing ink pen to mark the square corners first before attaching. Once you have marked them, match the markings of the corners exactly with each corner of each quilt square (we did this using safety pins). Finally, secure each corner with tie stitches using thick crochet thread and a big needle. The attachment was from the center squares to the periphery.
Ties: 9 used

And the verdict and the most rewarding part of this project - quality time spent with dd!


Thursday, July 12, 2012

Until I find my own words...

There is an unspoken balance
time has clearly explained
between what I've lost over the years
and all that I have gained...

Every trait that I surrender
as I slowly "lose" my youth
is replaced with a life's lesson;
traded for...
a Simple Truth.

I am the product of my years;
they have created what is me.
And every day that I have lived
has made me who I want to be.

Each person I have known or loved
is a part of who I am today.
Each left me something in my life;
each helped me find my way.

I've heard it said, "If I knew then
everything that I know now..."
But we are taught at the proven pace
that time...and life...will both allow.

These truths I've learned
from things I've done
and places that I have been...
what I'd give to take them back with me
and live my life again. 
An excerpt from
Simple Truths of Life
by Linda Ellis 


Tuesday, April 10, 2012

A sneak peek of my upcoming class

This weekend my focus was on exploring the Draw tool in PSW2.0. I wanted to create 'clean line' or true vector images and use a mix of auto and manual punch to digitize them. My first thought was to create an embossed monogram for fabrics with pile or nap. This was easy enough with the use of the complex fill tool that also allows for "holes" to be inserted in the design. I was quite pleased with the final 3D effect.
My next thought was to overlay a lightly filled backdrop to showcase letters with thin column stitches that would otherwise get lost in the nap. This created a dainty effect versus a more bold effect of the embossed design."Hers" is a freebie from Sewweird newsletter.

 In the hoop, patchwork quilt is another option since the Draw tool allows clear cut shapes that can be digitized automatically. Applique patches would be yet another option. There are so many other creative possibilities whirling in my head I can barely keep my thoughts straight.

Sunday, April 1, 2012

Mark your calendar for the 3rd!

I have marked my calendar for the third of each month of 2012 - Jenny of elefantz, a very talented designer, is sharing her love with us all. In one of my blog hopping sprees, I stumbled upon this site. What caught my eye was the simple yet elegant style of designing. I immediately knew I wanted to participate in her BOM. These designs are meant for hand stitching, but she has graciously given me permission to digitize them.
http://www.elefantz.com/search/label/Promises%20and%20Borders%20BOM%202012

As I was digitizing, my mind was racing with endless potential of the
 designs, butt I wanted to stay true to the austerity of the original work. I kept tweaking till the last minute and finally decided to stitch them out since the next BOM is due in only two days and I am already a couple of months behind. 
Thanks Jenny for the beautiful offer - here is my version.

I have also used a part of this block to create a tissue box holder. I added a few beads in the center of the flowers for a different look.
 

Monday, March 19, 2012

A makeover over the weekend

I've had a pair of black heels for some time that I have been unable to wear because my feet would fall out of one side due to the lack of support from straps on the inner part of the shoe. I stitched a piece of lace in black and created an extra strap on each shoe and used E6000 along with a few extra stitches to secure it in place. Here's what it looks like, and now my feet do not keep falling out of the shoe anymore!


A shirt with a low neckline got a makeover too. Both of the laces
are from http://www.adorableideas.com/. They are sturdy, yet not stitch heavy at all.


I have recently discovered Jenny's blog and I am sending this over to her as a repurposing  2012 challenge entry. Visit her awesome blog at http://www.elefantz.com/search/label/Re-purposing%202012

Tuesday, March 6, 2012

A gift for my daughter

When my dd first moved out of the house to go to college dorm, I promised to make her a robe. I leafed through several sewing catalogues to find a pattern, waited for the 99 cents sale and finally bought one. Then the 50% off fleece sale came through and I rushed to the store. I also called her from the store to find out what was her color preference. Not to mention, this was all within the last two weeks of her homestay before leaving for college. I studied the pattern in detail and cut out the pieces for her size. Then, suddenly, the project lost steam and the fleece was wrapped up in plastic bag and sat amongst my ever increasing pile of fabric. Every time my dd came home she asked me if I had started working on the robe and every time I replied 'I will, as soon as I can get my life together', but trivial things and silly excuses kept me pushing off the project.
Meanwhile, I even bought more robe patterns that were not even vastly different from the existing ones. I bought more fabrics too.
Pattern used


Then the day arrived when she graduated from college and moved on to grad school in a different state. The robe was still not done and the fleece stared at my face - and I occasionally glanced at the fleece with a twinge of guilt - a guilt not for making the gift but for allowing myself to bound by my compulsive obsession that eventually choked my stimulus. (Am I being too harsh on myself?)

Piles of fabric filled boxes occupying my master closet were a sure testament to my compulsive hoarding nature. I had a project in mind with every single one of these fabrics yet I never got around doing most of them. What was once a source of inspiration was now a source of constant anguish. Every single one of them was so precious that I felt I would scar them if I cut through them  - so they languished in the boxes smelling of mothballs.
All over the internet people have been de-stashing by opening up sales and giveaways. I was ready to de-stash too, but not ready to part with my fabrics, at least not yet.
Deep breath, one day at a time, one goal at a time is my motto now. So what if I never reach the finish line? Someday I will be close to it, so in the meantime let me enjoy this journey!
My dd said  'I could have bought one long time ago, but have been waiting for you to make me one'.
I could not procrastinate any more - I pulled out the fleece and the pattern. Of course it had to have some embroidery too, I needed to add my signature. At least this time I did not try to create my own embroidery design I used one from myembroideries.com.

With love I present to my dear daughter -


Close up
A daughter is a mother's gender partner, her closest ally in the family confederacy, an extension of herself.  ~Author Unknown

Monday, February 13, 2012

Roses - symbol of love and beauty

The roses that survived the parching summer of 2011 are  now in full bloom, creating an appealing spot of color palette in the midst of grey winter. Coincidentally, my Amazon book order of 'The embroidery of Roses' has also arrived. Snapshots of these beautiful flowers have inspired me to create a series on digitized rose gardens inside the house.

Love is in the air!
I want the world to know that my creation of beautiful blooms is my token of love and affection for you my dear valentine ... to honor our beginning and our journey together.
Besame Mucho!
http://www.youtube.com/watch?v=gPRESlT4Ccg&feature=artist

Tuesday, February 7, 2012

Font class

My font embroidery class was quite successful! I have never digitized fonts before, so teaching this class was a learning experience for me.What I found was that PSW 2.0 not only has 48 built in fonts, but also allows you to access the true type fonts that are already installed in your machine. In addition, you can download new ones from free font sites. Of course, don't forget to check the free download  policy if you are using the fonts for some kind of profit. The downloaded fonts are strictly for personal use.

One of my students posed a challenge - creating an applique design, instead of a filled design which I had prepared for the class. We were able to create one, but were limited by the font choice. A neighborhood lunch gathering provided me with another opportunity to create some fun type fonts for personalized name pillows for two kids. The pillow materials were somewhat fuzzy and uneven, which posed a risk that the designs might sink in and get somewhat lost. Also, correct hooping and centering was a challenge too.

Instinctively, I knew that the designs needed a good underlay that would create a good foundation for the top stitches. Also, the stitch type would have to be something other than satin since the width of the individual lettering was more than 11 mm in certain places. I left the density at 4 since I did not want any of the fuzzy materials to show up between the stiches and used a step satin stitch. My pull compensation was set at 3 and 2. The final stitching was not too bad except for a couple of places where there was some shifting and the guideline did not get covered with the top stitch. This did not happen when I stitched this out on a velvet material. I used iron on tear away stabilizer for the back and tear away washable stabilizer on the top. I am not sure if the top stabilizer was not pinned tight enough and maybe that caused this to happen.

I must also mention here that I am very grateful to Pat of Sewamused for her help. She is always very quick with her knowledgeable response. Check out her books on her yahoo group at: http://groups.yahoo.com/group/TeamSewAmused/.
Ok so now onto how I converted the Curlz MT filled font to an applique.


  • After building the stiches, I added an outline stich manually around each letter.
  • I copied and pasted the line two times with a stop in between each.
  • Then I started editing the second layer of the outline stich by converting it to a column satin stitch that set to a width of 15 and higher density of 20, so the stiches were spaced enough to create a zig-zag look.
  • The last, or topmost outline, was converted to column satin stich with a density of 4 and a width of 30. I used a guideline to make sure that the applique material was snuggly tacked and the top stich would cover the edge of the cut area properly.
  • I did not use any underlay, but I would If I were stiching this out on a towel or a fuzzy material. Putting an underlay can be a part of future editing. Lastly, I deleted the original filled space.
The first layer of outline stich served as a guideline on the base fabric that was used as a visual aid to lay the applique material. The second layer of zig-zag stich was used for tacking the applique fabric and as a guide for cutting out the excess. The last layer of dense stich was the actual top stich to hold the material in place.

I also used my fonting experience to create a frame and stabilizer holder.